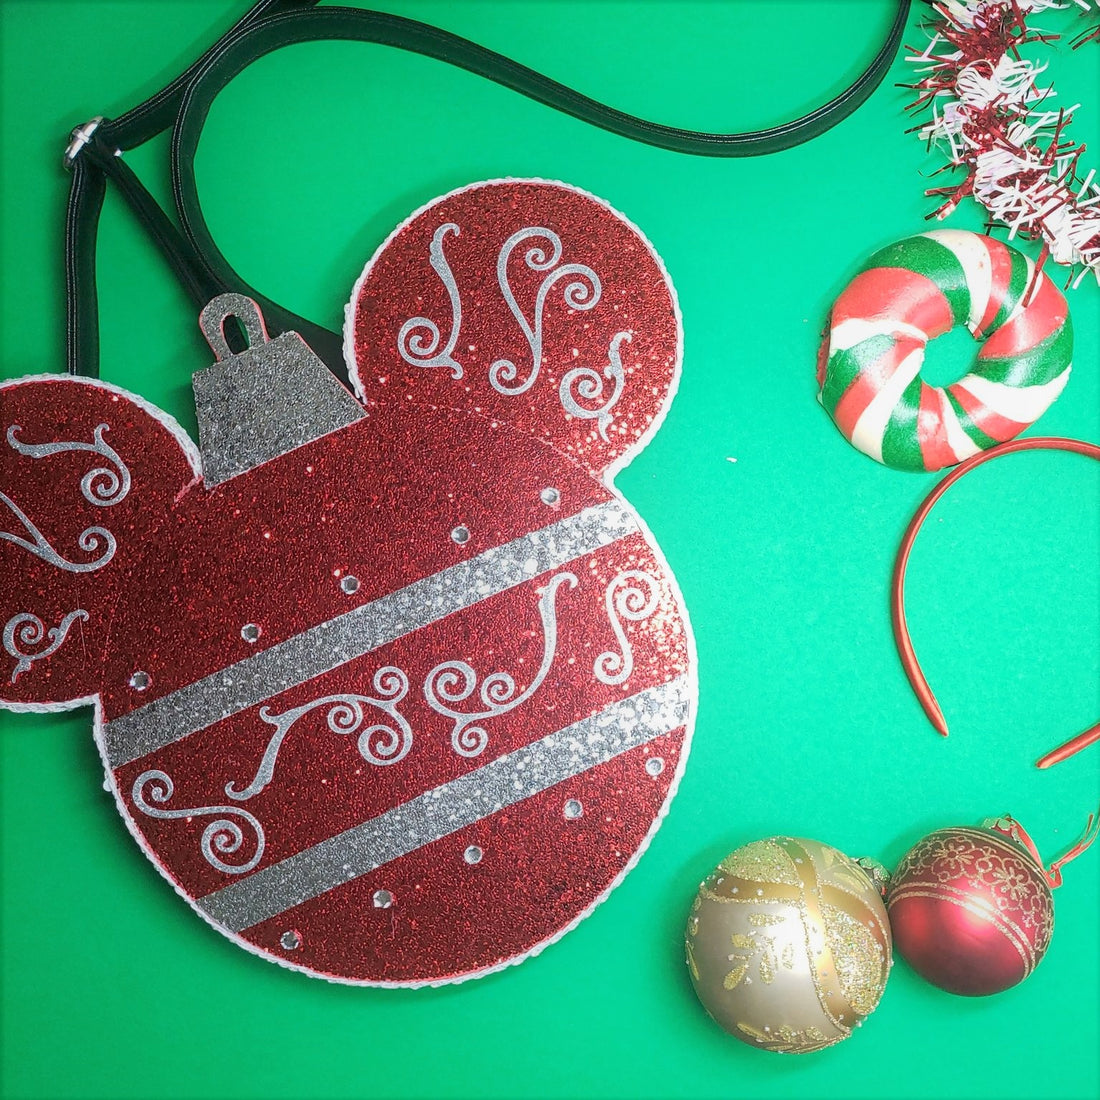

Back this week with another fun DIY for the holidays before we wrap up the year. This DIY was inspired by Disney's Mickey ornament purse. I spotted this purse at the Dress Shop in Downtown Disney and I just loved it! What I disliked about it was the price tag..It retails for $65 in store and I looked online and it's being resold for over $85. With that being said, here is a DIY that costs under $20 and it's just as cute.
Here are the materials you will need:
- Chunky glitter paper (2 red and one silver)
- Filigree silver stickers
- A plain black round purse
- Rhinestones
- Fabri-Tac glue
- Hot glue gun
- Scissors
- Circle-cutter or Mickey Stencil
- Ruler and pen
- Eva Foam, 2mm thickness
- Trim
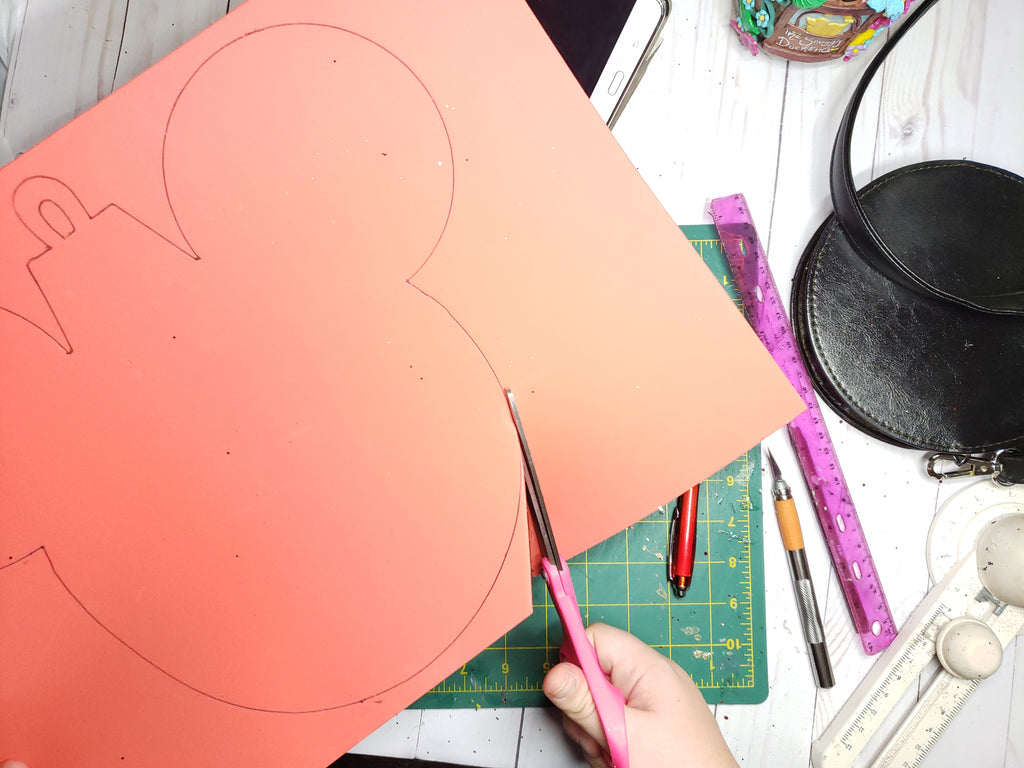
I craft all the time, so I have a circle cutter that I used to make the Mickey ears and head. If you do not have one then please print out a stencil and trace it onto your red chunky glitter paper. I attached a stencil here that would work perfectly for this project.


Please keep in mind the size of your purse. If your purse is 6 inches wide then make sure the mickey head is a little over 6 inches. The purse I had on hand was smaller than I liked so I made my mickey head a lot bigger than the purse. You can do this if you want but personally I think keeping it the same size as the purse looks nicer. Next time I will purchase a purse that is a little bigger.
If you used a stencil then skip this step and move onto the next step. Next glue the ears onto the head to form mickey's head.


I referenced back to the Disney Parks purse for spacing and placement.
Once the mickey head is ready, it's time to work on the silver top. Place the silver chunky glitter paper behind your mickey head to gauge where it should be. Then measure out about 1.5 inches from the head.

After you mark the height of the top, draw a line horizontally.


Once your line is drawn, you can add the diagonal lines to make the sides of the top.


I used a ruler for more accuracy but it was a little lopsided so i fixed it when I cut it.
Okay now you want to remove the mickey head and lengthen your lines to the edge of the paper.

Now cut it along the lines and your top is almost completely ready. 
Then, check if it fits okay and do not glue it just yet. 
Next grab your silver chunky glitter paper and start sketching out the loop. Cut the loop out and glue it to the top using hot glue.


Next, flip your silver chunky glitter paper so you have a clean edge on the bottom. You want to cut 2 strips. You can use your ruler, mark it and cut or if you have an X-acto knife then carefully use that! Here is an attached X-acto knife I found on Amazon.


Next, pull out your stickers and strips and start working on the placement. No glue needed yet.


I played with this a few times until I liked the set up.
The stickers didn't really stick to the chunky glitter so a little hot glue will do the trick. If this is being used as an all day thing then try coating the top of the stickers with Mod Podge.

I used the backside of the clear plastic the stickers came on and moved the stickers onto it so that I could glue the ears first.
Next, it's time for gluing on one of the strips. Make sure it's even on both sides so it is straight. Cut any excess paper off the sides.


I measured a finger away from the ear for the placement to be equal on both sides and not crooked. Simple way of doing this without a ruler.
After that, it is time to work on the middle set-up. Grab your stickers and follow the placement you planned at first. Make adjustments as needed of course and glue them down! Also glue the second strip to the bottom of the design and glue the top of the ornament.


Now it's time to add more sparkle! Add some rhinestones on the outside of the strips staggered from each other. If you want to, use a ruler to help keep the rhinestones straight along the bottom.


This is where you add more body to the flimsy paper. I used a red Eva foam from Hobby Lobby to add some thickness. It is pretty thick so the ornament won't bend. Another option would be felt which would work out fine. I traced the ornament all the way around and cut it out.

This is where the X-Acto knife comes in handy. I used it to cut out the loop on the top of the ornament. Scissors can be used to, but it is harder.

Then, you hot glue the paper onto the foam. Make sure they match up as perfectly as possible.

Next, add a trim with the same thickness as the foam and paper put together. Mine was slightly wider, and that is totally okay. I only say to try because if it is flush with the thickness of the bag, then it will most likely stay out longer. I didnt go around the top of the ornament. I felt like it didn't need it.


Now that you're ornament is complete, its time to attach it to the actual purse! I used Beacon Fabri-Tac to glue it. I'm sure hot glue would be just fine in this cold weather, but just to be sure, I used Fabri-Tac. The choice is yours! Price wise Fabri-Tac can be quite expensive if you're planning on using this only once and not with a discount. I pressed down from the inside of the purse to help glue it down.


I made the ornament bigger than the purse, which I completely regret. I should have made them the same size. I also just grabbed a purse I had on hand so it was much smaller than I would like, hence why I made the ornament bigger. That was also a con in the Disney one. It was way too small to fit anything I owned. If I were to do this again I would purchase this purse here. It is about 8 inches wide, which is perfect and only $9!

That is all folks! Hope you enjoyed this fun tutorial! Please comment below if you enjoyed this and DM me on @thisdflove if you do it yourself:)
As always XOXO,
Jasmine
2 comments
girl! i luv it!! the mickey head would great as wall decor or as a giany lollipop too 😍😍
girl! i luv it!! the mickey head would great as wall decor or as a giany lollipop too 😍😍